Do you want to know how to access 192.168.10.1? 192.168.10.1 is the IP address for the default gateway for some specific routers. Just like other IP addresses such as 192.168.1.1, 192.168.0.1, 10.0.0.1, 192.168.254.254 or 192.168.1.1.
Using this private IP address will provide the user access to the router’s setup page or Web UI. The access to the configuration page like that of TP-Link routers and ASUS modems is required so you can set up a custom SSID or network name and WiFi password.
But of course, you will need the default username and password, this information is available on the sticker of the router. It should be at the bottom or at the back of the router itself.
In this article, we will share a detailed guide below about how to login to your router default gateway at 192.168.10.1. To save some time, click on any of the buttons below to login to your router admin page now.
Contents
How to Log in to 192.168.10.1
192.168.10.1 Login 192.168.1.1 Login
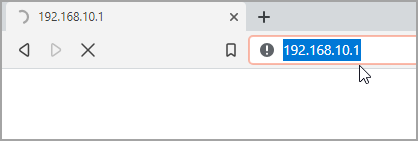
- Step 1: In order for you to access the router’s setup page, you will have to launch a web browser. Any web browser will do such as Mozilla Firefox, Internet Explorer or Google Chrome.
- Step 2: On the web browser’s address bar. Type in the 192.168.10.1 and press ENTER.
- Step 3: A login page will appear that will require you to enter the username and password.
192.168.10.1: Reminder
If you or anybody has not yet changed the default router username and admin password, you can check for the sticker at the bottom or back of the router itself. All the information you need to access the router’s web UI should all be there including the WiFi SSID and password.
If the router settings were changed prior to this, you will need to reset your router. Here are some guides that you can use:
- Reset Any Router (General Knowledge)
- How to Reset Verizon Router (Step-By-Step Guide)
- How to Reset ASUS Router (Step-by-Step Guide)
How to check if your router is associated with 192.168. 10.1 IP address?
If you are not sure if your router uses 192.168.10.1 as a default IP address, you can check this instruction on how to find the router’s IP address in Windows computers by following this method below.
Using the command prompt
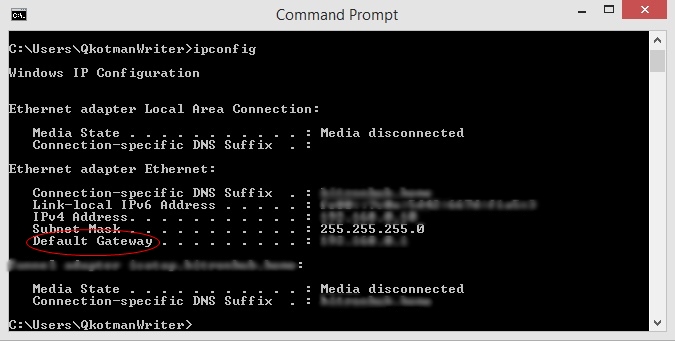
- On your Windows PC keyboard, press the Windows key + R. A dialog box will appear on your screen.
- Type in CMD then press the ENTER key.
- The command prompt will open. Now on the command window, type the ipconfig and press the ENTER key.
- You can now look for the ‘Default Gateway‘ in the list which appears on your screen. You will find your routers default gateway mentioned there.
Note: That’s how you find IP address on Windows. Here is the guide on how to find IP address on Mac and Linux.
Possible issues when accessing 192.168.10.1 IP address and Why?
Here are possible issues that you may encounter when getting into the 192.168.10.1 IP address with a bit of explanation as to why your experience such problems.
This site can’t be reached

This is a normal error when the current IP address or DNS assigned to your device is not communicating properly with the rest of the network. You can fix this issue by changing the automatic DNS designation to the manual. Here’s how to do it.
- Step 1: Open the adapter setting. Press Windows key + R to launch the Run window. Now type NCPA.CPL and press ENTER.
- Step 2: Click on the network adapter that you are using to connect to the router’s network.
- Step 4: On the next window scroll down and look for the TCP/IPv4 and double-click on it.
- Step 5: Tick on the Use the Following DNS Server Addresses and type 8.8.8.8 for Preferred DNS Server and 8.8.4.4 for Alternate DNS Server.
- Step 6: Check the Validate Setting Upon Exit and hit OK to exit and so on.
- Step 7: Now try connecting again to the internet.
No Internet Connection
Sometimes when everything used to work earlier than when you boot up your device again you see the “WiFi Connected But No Internet Access” error, do not panic.
Before you get drastic and make huge changes in your router’s settings, try checking all the cables and cords. See to it that they are connected properly.
FAQ
Step 1: In order for you to access the router’s setup page, you will have to launch a web browser. Any web browser will do such as Mozilla Firefox, Internet Explorer or Google Chrome.
Step 2: On the web browser’s address bar. Type in the 192.168.10.1 and press ENTER.
Step 3: A login page will appear that will require you to enter the username and password.
There could be two reasons why you can’t access 192.168.10.1.
1. this IP address is not your router’s IP address (check your device’s underside for the correct IP address)
2. you are not connected to the internet through the router associated with this IP address.
There could be two reasons why this is happening.
1. This is a normal error when the current IP address or DNS assigned to your device is not communicating properly with the rest of the network. You can fix this issue by changing the automatic DNS designation to the manual.
2. Sometimes when everything used to work earlier than when you boot up your device again you see the “WiFi Connected But No Internet Access” error, do not panic.
Step 1: Open the adapter setting. Press Windows key + R to launch the Run window. Now type NCPA.CPL and press ENTER.
Step 2: Click on the network adapter that you are using to connect to the router’s network.
Step 4: On the next window scroll down and look for the TCP/IPv4 and double-click on it.
Step 5: Tick on the Use the Following DNS Server Addresses and type 8.8.8.8 for Preferred DNS Server and 8.8.4.4 for Alternate DNS Server.
Step 6: Check the Validate Setting Upon Exit and hit OK to exit and so on.
Step 7: Now try connecting again to the internet.
If you are not sure if your router uses 192.168.10.1 as a default IP address, you can check this instruction on how to find the router’s IP address in Windows computers by following this method below.
Using the command prompt
1. On your Windows PC keyboard, press the Windows key + R. A dialog box will appear on your screen.
2. Type in CMD then press the ENTER key.
3. The command prompt will open. Now on the command window, type the ipconfig and press the ENTER key.
4. You can now look for the ‘Default Gateway’ in the list which appears on your screen. You will find your routers default gateway mentioned there.
Conclusion
This is all you need to know about 191.168.10.1 IP address. To conclude, The 192.168.10.1 IP address gives access to a router’s admin panel. If you have anything to add, then please let us know about it in the comments section below.